Monday, April 13, 2009

THINKING OF YOU- MONDAY SNSS CHALLENGE #20

Hello! I hope you had a wonderful weekend. I had cards to post, but ended up taking the weekend off from blogging to play some games and do some activities with my children and family. We had a great weekend together.

This week's challenge is to make a THINKING OF YOU card. While the sentiment on this card, isn't exactly THINKING OF YOU - the sentiment would be encouraging.

Here are the details:

Stamp Set: His Eye is On the Sparrow by Sweet 'n Sassy Stamps

Cardstock: Regal Rose, Ballet Blue, Basic Black, Whisper White

Accessories: Primas, Ribbon, Dew Drops, Mini Glue Dots

We would LOVE to have you participate in the challenge. Create a THINKING OF YOU card and link up to Challenge #20 on the Sweet 'n Sassy Stamps Blog.

Be sure to check out the other Design Team projects!

Jeanette Olen

Courtney Fowler

Sandy Domelle

Korin Sutherland

Thank you for stopping by! Have a blessed day!

Chrissy D

Friday, April 10, 2009

BLOGGERS CHALLENGE #94 - Remembering Good Friday...

Hello! This Friday the Bloggers Challenge is to create a card using the Technique of our choice. I used Technique Junkies Newsprint Reveal. I was the Guest Designer in April, and this was one of the cards I submitted. So I am taking the easy way out today!


As a Christian, today is a day of remembrance of Good Friday. The day our Saviour died on the cross for our sins..

Romans 3:23 “All have sinned and fall short of the glory of God.”

Revelation 21:27 “There shall by no means enter it (heaven) anything that defiles, or causes an abomination or a lie, but only those who are written in the Lamb’s Book of Life.”

We all are sinners. Everyone has done things that displease a Holy God. No one can live up to His standards. He says no sin can enter heaven. Something must be done to get rid of your sin.
Believe Jesus died on the cross for you. God loves you and wants you to become His child. He loves you so much that He sent His Son, Jesus, to shed His blood to save you from your sins. He took your place on the cross, and suffered the punishment you deserve. Believe that He died for you, was buried, and rose again on the third day.

1 Peter 2:24 “Who Himself (Jesus) bore our sins in His own body on the tree (cross), that we, having died to sins, might live for righteousness.”

Colossians 1:14 “In whom (Jesus) we have redemption (salvation) through His blood, the forgiveness of sins.”

Acts 16:31 “Believe on the Lord Jesus Christ, and you will be saved.”

Luke 18:13 “God be merciful to me a sinner.”

Romans 10:9 “If you confess with your mouth the Lord Jesus and believe in your heart that God has raised Him from the dead, you will be saved.”

Romans 10:13 “Whoever calls on the name of the Lord shall be saved.”

Have a blessed weekend! Thank you for stopping by!

Chrissy D

Thursday, April 9, 2009

Newsprint Reveal and an Announcement...

Hello! The past two days, I have been feeling a bit under the weather. My stomach is crampy and not feeling quite right and I have a sinus headache. ICK. Yesterday was far worse than today, I woke up, grabbed a cup of coffee, had 2 sips only to get so nauseas I ended up back in bed. By lunchtime, I felt better and was able to function again. Today, I am able to function, but trying to take it easy.
This morning, while enjoying a cup of coffee I was reading my e-mails and recieved one from the Technique Junkies Newsletter. Remember, I am their Guest Designer this month!? This is my exciting news... I have been invited to join their Design Team!!! I will start in June!
This card is one I made yesterday. I used Technique Junkies April/May Newsletter and the Technique Newsprint Reveal technique. I also combined Splitcoast Stampers Color #213 and Sketch Challenges #223.
Here are a few more details...

Stamps: From Sweet 'n Sassy Stamps - Dream Silhouettes, A True Friend
Paper: bashful Blue, So Saffron, Spring Showers, Chocolate Chip
Accessories: Martha Stewart butterfly punch, Brads colored with Copics, Dimensionals, Scallop Edge punch, Clear EP, Brayer, Heat Tool
Have you participated in the Belli Challenges yet? Check them out HERE.
Thank you for stopping by! Have a blessed day!

Chrissy D

Wednesday, April 8, 2009

IT'S WEDNESDAY! DOUBLE CHALLENGE DAY!!!

It is BELLI CHALLENGE DAY! I know I have said this a few Wednesdays in a row now - but did you know we moved to a new BLOG and changed the name? Please join the fun at http://www.bellichallenge.blogspot.com/!

This week's Belli Challenge was to use your Cello Bags...I was all set had this project set up and realized that this uses the clear envelopes.

I am back with the tutorial. I was all prepared to share it here this morning, but then got a wave of nausea, so I went back to bed. Are you an American Idol fan? I tend to record everything, but then my DVR cut off the show early...ARGH! I missed my favorite! Adam Lambert! But thankfully due to modern technology I found it here - check it out!

http://s79.photobucket.com/albums/j141/mjsbigblog/Top%208/?action=view&current=adam-top8.flv

I created this little booklet with my new Digi-print Graduation set that is available at Sweet 'n Sassy Stamps. When you participate in the Belli Challenge this week, you can win this Digi stamp!!!

The instructions for this came from Jill Smith, 2006

Clear Envelope Album

Covers: One piece of cardstock cut into TWO pieces measuring 4 3/4" x 8 1/2". Score each cover piece at 1". Fold completing crease with the bone folder.

Binding: One piece of cardstock measuring 2 1/2" x 4 1/4". Score at 1 1/4", fold, completing crease with the bone folder. (I skipped this portion on my project)

Envelopes: Stampin' Up! Clear Envelopes: 5

Accessories: Brads - Quantity 2 (I used 5), 1/16th hole punch, Bone folder, Sticky Strip

Directions:

1. Layer Clear Envelopes on each other, one at a time, by lining up the closed ends/ Use the envelope adhesive to stick them to each other. Make sure the envelopes are all the same side up (i.e. side the envelope opens on)

2. Stick the Clear Envelope stack on top of one of the folded flaps of one of the cover cardstock pieces.

3. Place the other cover cardstock piece, folded flap down, on the top of the envelope stack. Use 1/16th punch to punch TWO holes, one from the top and one from the bottom, through BOTH cover pieces and the envelope stack. Insert your brads. (Note: You are creating the look of one of the Post Bound Albums. This will also allow more envelopes to be added to the Clear Envelope Album at a later date.)

4. Attach binding cardstock piece using Sticky Strip, around the folded ends of the Album.

5. Decorate your cover as you wish.

Here is the fabulous Design Team links - go check them out and let them WOW you!!!


I will post the tutorial for this by lunchtime today! Now onto the Bloggers Challenge!


This week's colors...

This week, Tootles & Binks is our Sponsor! When you participate be sure to link up with Mr. Linky for your chance to win! Be sure to check out Tootles & Binks website too!


Be sure to head on over to the Colour Copic Challenge Group for more information and to see MORE TOOTLES & BINKS! VERY CUTE STAMPS and SO Fun to color!
Visit the Design Teams Blog for more inspiration with these colors!
Chrissy D

Tuesday, April 7, 2009

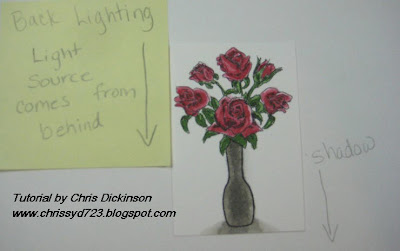
TUTORIAL: Why Light Direction Matters in your coloring

LIGHTING AND SHADING
Tutorial by Chris Dickinson
www.chrissyd723.blogspot.com

Why Light Direction Matters in your coloring…

If you want your coloring to look authentic or realistic, you want the direction of your art to be consistent throughout your entire project that you are creating. Sometimes, the stamped images will show you lines with the shading done already, but other times the stamp will not include the shading so you cdan have a bit more flexibility in your coloring.

You may want to get a lamp that you can change angles and choose a still life object to play around with your light direction and shadows. Remember when you were young and you would try to hide from your shadow or jump on it? (Or was I the only weird one? LOL) It typically would move around depending on the time of day or where you were standing. The following notes will help you in directing your shadows when you color.

With your Light Direction, you have several different options…

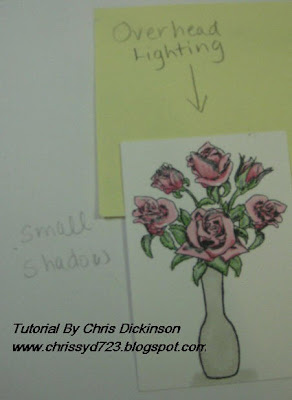
1. Overhead Lighting – This is when your light hits your objects from over head.
When outdoors, over head lighting happens around mid-day. Your shadows will be small and directly underneath your stamped images.

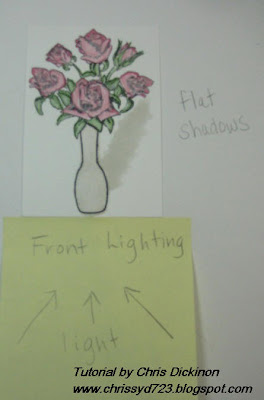
2. Frontal Lighting – This lighting occurs when the light is in front of your stamped image. There is a lot of contrast between your objects and tends to flatten them, eliminating fine detail.


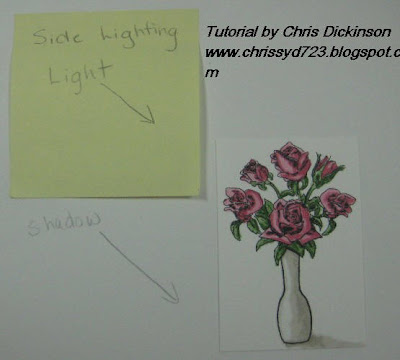
3. Side Lighting – This lighting occurs when the light hits your stamped image from one side. When outdoors, side lighting will happen in early morning or early evening.


4. Back Lighting – This lighting occurs when your light is directly behind an object. It will create a dark silouette.


5. Soft or Overcast Shadows – This lighting happens when you want your artwork to look like the lighting is filtered, smoke, pollution, clouds, etc. There will be softer shadows and colors and there will be very small contrast in the shading.


These tutorials take extra time and I want to make sure they are helpful to you and worth the time! Please let me know - good or bad I can take it!

Have a blessed day!
Chrissy D

Monday, April 6, 2009

EASTER SILOUETTES - Monday DT Challenge #19

Good morning! I am happy to share this week's challenge with you...Create a card using an EASTER THEME!

I honestly made one card and realized after that it was more Spring than Easter...and by that time, I was all out of OOMPH and didn't feel like stamping anymore but wanted to complete this challenge... I hopped over to the OCC Blog and saw Silke Ledlow's card. WOW!!! Is it gorgeous - head on over and check it out. I ended up CASING it and changing the stamps. I also used a Technique Junkies technique -Pigment Scrunch.

Here are the details:
Stamp Sets: Dream Silouettes, Easter Scripture
Cardstock: Whisper White, Bashful Blue, Pretty In Pink, Regal Rose DP
Accessories: Colorbox Ink, Eyelet Scallop punch, button, Taffeta ribbon, distressing tool, White brads
As always you are welcome to use any stamps for our challenge, although it thrills us to see you using your SNSS stamps :).When uploading to SCS & PCP galleries use keyword SNSMC19.

Be sure to check out the following DT blogs for more inspiration:
Thank you for stopping by! Have a great day!

Chrissy D

Friday, April 3, 2009

DAY 3 BLOG HOP, BLOGGERS CHALLENGE AND FUNNY CANDY

HAPPY FRIDAY! We hope you will join us tonight for the Release Party! Here is the link to the forum for the Release Party from 9pm-11pm EST! Hope to see you there! Be sure to join us for the HOP!
I combined the BLOGGERS CHALLENGE with the BLOG HOP and Sandy's Challenge for the Release Party! It is a FUN color challenge - and you can have an opportunity to win a FREE stamp set if you participate! I used the elegant Easter Scripture set for this card...

Be sure to click on the Blogger Challenge Blinkie on the side bar and view everyone's projects! They are sure to wow you! I enjoyed this sketch and I even tried to keep it simple! LOL

You will also want to check out the other Design Team members for their BEAUTIFUL projects for the BLOG HOP!

Courtney

Korin

Deb

and back on the SNSS Blog to wrap it up!

Now something to make you SMILE!

Yesterday, I was sitting in my office doing some stamping and my 4 year old daughter, came into my office holding something behind her back.

She said, "I found candy in a room."

I said, "what kind of candy?"

She said, "Special Candy that is very yummy!"

I said, " Show Mommy, the special candy!"

Sooooo....(see attached picture)

I tried telling her that it wasn't candy, but she didn't believe me! So I grabbed my camera and took this picture...
I hope to see you at the Release Party tonight! Have a FABULOUS DAY!!!!!

Chrissy D